Only a crafter can understand the fun of creating stickers with Cricut. In this process, learning how to make Cricut stickers becomes even more important because it gives us more freedom to create unique and perfect stickers instantly. Cricut machines are advanced enough to make anything you want in a few minutes. However, you need proper guidance to create a proper custom sticker using a Cricut machine. In this guide, I will help you through the entire process.
In this tutorial, I’ll show what you’ll need to create a sticker with your favorite font, design, or image in less than 10 minutes. Once you learn the process of making stickers with Cricut, you will have endless opportunities. All you have to do is implement the points mentioned further in the guide.
Supplies Required for Creating Cricut Stickers
Before we begin the guide, gather the supplies outlined below. With all of these items, you will be able to create the best-looking sticker.
- Sticker paper or Cricut printable sticker paper
- Cricut machine (Preferred that supports Print-Then-Cut )
- A computer with the Design Space software installed
- Transfer tape
- Weeding tool
- Scraper
- Inkjet printer
- Complete guide
- Light Grip cutting mat
Step 1: Download the SVG File of the Stickers
I mostly download premade stickers and customize them in the Cricut software. I suggest you download a free SVG file of stickers from somewhere online. Download the file always in .svg format and unzip it.
Step 2: Upload SVG on the Cricut App
- To learn how to make Cricut stickers, open the Cricut app and start a New Project.
- Next, click the Upload icon in the bottom left toolbar.
- Now, browse the downloaded sticker sheet to upload.
- After that, select the image type as a Complex from the list.

- Also, if the file is absolutely clear, then there is no need to erase click on Next.
- Finally, select “Print Then Cut Image,” add the image name and any tags, and then click “Upload.”

Note: Instead of uploading a sticker file, you can access the Cricut Design Space library or create stickers.
Step 3: Customize Your Sticker Design
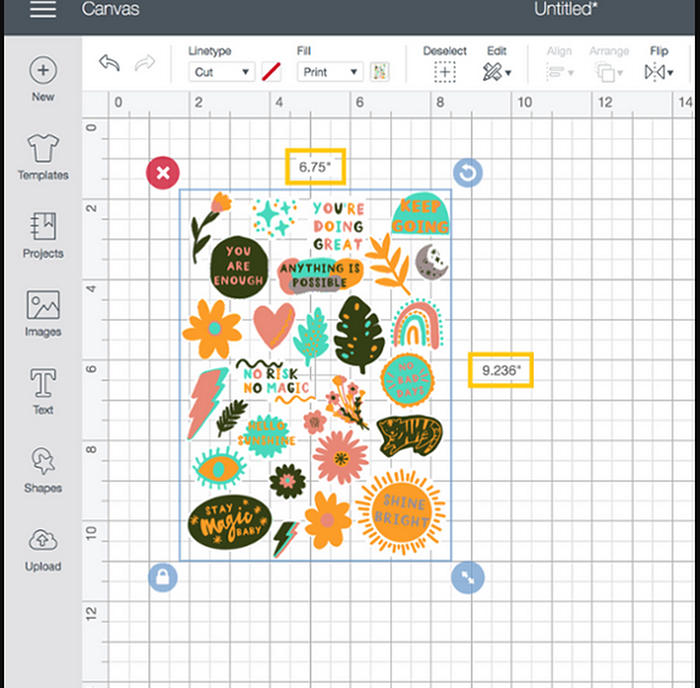
- When the design is uploaded, it is on the canvas of the Cricut app, where it can be modified.
- We won’t be making any specific modifications, so simply drag the design and get “Print Then Cut” the maximum size, which is 9.25″ x 6.75″.
- Next, double-check the design and click on “Make It.“
Step 4: Select the Printer
After all, you’ll be on the preview screen, where you’ll see your design placed on the virtual mat. One thing you’ll notice is that your design will become a rectangular black box. This allows your machine’s sensors to read exactly where to cut.

From the drop-down menu, choose the printer and then turn on the “System Dialogue,” this will allow you to access your printer.
Step 5: Take a Printout and Place on the Mat
For how to make Cricut stickers, immediately load the printable stickers onto your printer by making sure your printer works. Then, start printing your design, and once it has been printed out, leave it for a moment. After that, line up your printed sheet on the LightGrip cutting mat.

Step 6: Cut Out Your Design
- Go back to Design Space and choose the base material as a printable vinyl and pressure default.

- Next, load the mat by pressing the Load button on your machine and Design Space. Press Continue and push the flashing Go button on the Cricut machine. Now, the machine will run and cut around each sticker.

Step 7: Unload the Mat and Weed Out Excess Particles
- This is the last step in learning how to make Cricut stickers. Once the cut is complete, take the mat off from the Cricut machine and flip the sticker sheet.
- If there are any negative particles, then use the weeding tool and remove them.
- Now, peel the stickers from the paper and add them to your project and surface.

Step 8: Apply Your Sticker
Now, let me give you some ideas on where you can apply these stickers. First, take a plain notebook and add a floral sticker to the cover. Moreover, you can add a personal touch to a gift tag with your colorful sticker.

Final Thought
Most beginner crafters wonder how to make Cricut stickers. In this blog, I have explained the complete process. First of all, we have to upload or create the sticker design on Cricut Design Space. After that, print your sticker design using the Print then Cut function if it is colorful. And you can cut it out with the Cricut machine and start using it for the weeding procedure. Keep making stickers like this to achieve more quality.
Source: how to make Cricut stickers
Visit here for more Information: cricut.com/setup